Thursday, February 28, 2013

Bacon, Beans, and Brussels

I really love this site: http://www.tastespotting.com/.  Not only are there beautiful pictures of food (that always make me hungry), but it is a great overview of all the food blogs out there.  It is one of the best sources of inspiration I have.  Last week, I was feeling a bit "dry" creatively, but after drooling over a couple pages of Tastespotting, I was able to find several recipes that I wanted to try and was able to easily create the week's menu.  The paleo pizza was the one I was most excited about, but I also found this recipe: (http://relish.com/recipes/great-northerns-with-leeks-and-bacon/).  It seemed super simple, but possibly a robust, deeply-flavored dinner.  Since Brussels sprouts and leeks are in season, they are abundant and cheap, so I bought a lot of both to make a huge pot of beans and Brussels.  Although we don't eat pork in our household, our friend introduced us to some yummy turkey bacon that I used in place of regular bacon.  It isn't as fatty, so mine did not fry up as crispy as I would have liked, but the flavor was what was important anyway.  I changed some of the components and added in a little vinegar and so I deem this recipe a success!  It made a great hot slaw dinner for us yesterday, but I also think this is a perfect side dish to just about anything.  It would be great with steak and mashed potatoes, or pork chops and applesauce!


T.E.A.'s Hot Brussels Sprouts Slaw
makes about 2 quarts

1 package Turkey bacon (about 10 slices), cut into strips
2 leeks, split lengthwise and sliced thin (see note below)
4-6 cups Brussels sprouts, shredded
1 TB garlic, fine mince
2-4 TB apple cinder vinegar
2 cups northern beans, cooked
salt and pepper to taste
olive oil as needed
water as needed

NOTE: It is important to wash leeks very well.  A lot of sand and dirt can get trapped between the layers.  Cut the leek lengthwise (without trimming the root...that will hold the layers together), then run the leek half under running water while peeling back the layers.  This should wash out all the trapped dirt.  Once washed, trim off the root end and the green part.  Only use the white, tender part of the leek...the green part is tough and bitter.


1. Wash leeks and Brussels sprouts and shred both in a large bowl.  I found slicing the Brussels sprouts in half, then slicing them easier than trying to cut them whole.


Leeks are one of my favorite vegetables.  They have a very mild, onion-y favor.  


Wash the Brussels well and peel of the outer layers if they seem brown or wilty.


2.  In a large pot or skillet, heat a little olive oil on medium high heat.  If you're using regular bacon, you can probably skip this step.  Add in bacon and fry until golden and crispy.  Take out of the pot and drain on paper towels.


3.  Put the pot back on the heat (adding more olive oil as necessary) and add in Brussels, leeks, and garlic.  Stir in the vinegar and a little water if needed.  Saute until wilted and soft, about 5-8 minutes, but still green and fresh looking. 


4. Add in beans and bacon and cook until all ingredients are warmed through.
5. Serve warm and enjoy!


UPDATE: My New Favorite Breakfast!

So, this isn't really anything new, but it is improved!  I have been doing research lately on Indian cuisine and I found a recipe that combines cabbage and chickpea flour into a fritter, much like the falafel I make for breakfast.  I had to try it out.  I keep cabbage in my fridge most of the time because it makes a great salad, or garnish, or addition to soups.  I just happened to have a dry salad (meaning no dressing) of shredded green cabbage, cilantro, and green onion in the fridge, so I put it in my falafel fritters one morning.  It is now our new, improved favorite breakfast!  The texture of the cabbage is great, plus the added flavor of the herbs and onions makes the fritters delectable.  After I added on some olive hummus (chickpeas two ways, haha), arugula, and a fried egg, I was in heaven.

T.E.A.'s New and Improved Falafel Breakfast Fritters
makes 4 medium fritters

1 cup chickpea flour
1 cup shredded green cabbage
1 TB chopped cilantro
1 TB chopped green onion
1/4 tsp paprika
1/4-1/2 tsp cayenne (if you like it spicy)
1 tsp lemon juice (or apple cider vinegar or rice vinegar)
salt to taste

Garnish:
1 cup arugula
1 TB olive hummus 
fried egg

I've already done these recipes, so you can see them here: http://theexperimentalalchemist.blogspot.com/2013/02/lets-garbonzo.html

Just add in the new ingredients and Enjoy!


Wednesday, February 27, 2013

Paleo Pizza


I've noticed that this "Paleo Diet" is really in style now.  Even friends I did not expect to be into diets are getting on board.  Like I said earlier, I'm not into "dieting," but I have done some nutrition research that indicates a low-carb diet is very beneficial..  This article is a short, but valuable overview of some of the latest nutrition findings: http://io9.com/5984275/the-worst-lies-that-mainstream-nutrition-has-told-you.  For that reason, I've been searching for recipes that provide me with the flavors and textures that I'm used to, but use little to no grains, even whole grains.  I've been finding more and more "paleo" recipes that are finding fun ways to skirt around carbs.  I recently found this Paleo Pizza recipe online and decided to try it out.  It uses cauliflower as the main ingredient in the crust instead of flour.  I have experimented with cauliflower in place of rice, and it actually, in my opinion, is a perfect substitute.  Tender, al dente cauliflower nibblets are almost synonymous to the texture of rice, plus cauliflower has the same, neutral flavor.  So, I couldn't help but think that, if done well, it would be a good substitute for a crust.  Also, I was excited about the toppings of this pizza because they are some of my favorites: olives, capers, anchovies.

The crust in the original recipe, however, contained mozzarella.  Since I don't eat dairy, and "fake cheese" is not a good substitute for the stringy texture of melted mozzarella, I decided to exclude cheese from the recipe altogether.  Because of this, I added in more egg to make sure that the cauliflower would stay together.  The end product was...well, not a great success in the sense that it wasn't at all like pizza crust.  It was more like a cauliflower omelet.  In hindsight, one egg might have held the cauliflower together and allowed for the crust to become crispy.  My other downfall was not drying out the cauliflower completely.  The original recipe made a point to say that the cauliflower needed to be very dry in order to work properly. I promptly ignored this, thinking it would be fine.  It, clearly, was not.  

Despite my downfalls, though, I actually would recommend trying this out.  Don't expect it to be a perfect substitute for crispy, gooey pizza goodness...that's not what it is about.  But is is a healthy dinner option that is fun and easy to make, and with all the delicious toppings, it has more than enough flavor to satisfy.  I know that I will be making this again, but next time, I'll try one egg, and super dry cauliflower.  Or maybe it will just evolve into Omelet Pizza and leave it at that! :)


Original Paleo Pizza Recipe
From: http://www.theironyou.com/2013/02/paleo-pizza-marinara.html

Crust

1 medium head cauliflower, cut into small florets
½ cup / 1.7 oz / 50 gr light mozzarella, shredded
1 large egg, lightly beaten
½ teaspoon fine grain sea salt
pinch of black pepper

Topping 

3 ladlefuls tomato sauce
3 tablespoons green olives, sliced
3 tablespoons black olives, sliced
1 tablespoon capers
1 tablespoon oregano
anchovy fillets (optional)
Olive oil as needed

Preheat oven to 450°F (220°C). Place a rack in the middle. Line with parchment paper a baking sheet and lightly grease it with olive oil.
In a food processor rice the cauliflower (not puree, rice grain size crumbles). Transfer to a microwave dish and microwave on high for around 8 minutes or until cooked.
Place the cauliflower rice in a colander, and with the help of a large spoon squeeze as much moisture out as you can. This is very important. The cauliflower needs to be dry. Otherwise you’ll end up with a mushy dough; not a crusty one. Alternatively you can place the cauliflower rice in a tea towel and twist it to squeeze out the moisture.
In a large bowl mix the cauliflower, egg, mozzarella, oregano, salt and pepper until well combined. 
Press the mixture onto the baking sheet. Bake for 15 to 20 minutes or until golden.
Remove from the oven and let cool from 5 minutes.
Spread tomato sauce evenly on the dough; top with sliced olives, capers and anchovies (if using). Sprinkle oregano on top and drizzle with olive oil. Bake in the oven for about 10 minutes.
Serve warm.


T.E.A's Version of Paleo Pizza

Crust:
1/2 head cauliflower, cut into florets
2 eggs 
salt and pepper to taste
optional: herbs of choice

Toppings:
1 cup tomato sauce (recipe below)
1/2 cup green and black olives, sliced
1/4 cup capers
1/4 cup anchovy fillets (I used the really yummy Turkish anchovies that I used for Pasta Puttanesca)
fresh arugula for garnish

1. Add cauliflower florets into a food processor and pulse until cauliflower resembles coarse meal.  In a bowl combine cauliflower, eggs, and seasoning.  Heat oven to 450F.


2. Line a baking sheet with parchment and oil with non-stick spray.
3. Pour cauliflower mixture onto parchment and spread out until about 1/2 inch thick.
4. Bake for 15-20 minutes until golden.


5.  Add on toppings, then put back into the oven until warm.


6.  Top with arugula and enjoy!


Tomato Sauce:

I decided I wanted something quick and easy, so I just threw some things together.  Plus, the toppings are strongly flavored and salty, so the sauce doesn't have to be overly complicated.

1 cup pureed canned tomatoes
1 tsp garlic, fine mince
sprinkle of dried oregano
salt and pepper to taste

Add all ingredients into a small saucepan.  Heat to a simmer.  Season to taste.   Use warm on pizza.

Tuesday, February 26, 2013

Juicing and Healthy Smoothies Part 2

I also have been wanting to talk about juicing because I started juice fasting on occasion about a year ago.  It all started when I watched a movie called "Fat, Sick, and Nearly Dead "(http://fatsickandnearlydead.com/).  The movie documents Joe Cross, an obese and chronically sick man, discovering the healing power of juice fasting.  He spent 60 days drinking only fresh fruit and vegetable juices, and ended up not only losing all his excess weight, but curing his chronic disease.  This movie was deeply inspirational because it showed just how influential a good diet is to your whole lifestyle.  I was so excited to share this with everyone that my mother-in-law graciously bought me a juicer so that I could try it for myself.  

I will admit right now that I'm not that great at juice fasting.  Fasting is hard.  Especially when you love to cook as much as I do.  Plus, when I have low blood sugar, and haven't eaten, I become a little grumpy mess.  However, I still fast because despite feeling grumpy, or hungry, or uncomfortable for a day or two, ultimately, juice fasting makes me feel amazing.  I have more energy, I feel clear-headed, and my whole body feels cleaner.  It is a great way to restart your metabolism, shrink your stomach back to normal size, and get a major punch of nutrients.  Although you could also eat a bunch of fruit and veggies, juicing allows for your body to absorb even more nutrients because juice is easier to digest.  It is much easier to ingest a grapefruit, several apples, a whole bunch of kale, and a large knob of ginger in a juice than eating them all whole.  Plus, if you aren't used to eating so many fruits and vegetables at once, juicing is an easy way to get into that habit.  I find that I crave more fresh, raw foods, like salads, after a juice fast.

The only downside to juicing is that it can be expensive.  For one, I like to buy organic produce for juicing so I can skip the chemicals used in standard farming, but buying a lot of it to juice is pricey.  Secondly, you have to buy a juicer.  Although you can find inexpensive juicers, it is best to research one that won't break down on you...and that might cost a little more.  However, I think if you're interested in juicing, and think you might use it year round, it is a great addition to your kitchen.  Also, to save money, I like to fast for 24-48 hours...enough time to get the benefits, but not long enough to break the bank.  

A word of caution: although I recommend juice fasting, you should never start something like this without researching it first.  If you have any conditions which might be adversely affected by fasting, then it would be good to be cautious.  Also, fasting requires the time to really take care of yourself.  It is great to do over the weekend when you have time to relax.  Although I have more energy when I fast, I have also had the experience of being much more tired while my body deals with the lack of food.  You could treat juice fasting like a "spa day" of sorts: drinking lots of water and pampering yourself a little bit.  Fasting does take a bit of getting used to, but the more you do it, the better it feels!  

There are lots of resources about juicing. I highly recommend learning more about it for yourself.  I am no expert, but I do think it is a great way to strengthen you body.  "Fat, Sick, and Nearly Dead" is a great introduction to juicing, and I also own a book by Leslie Kenton (http://lesliekenton.com/detox-now/2012/04/23/juice-blitz/) that has more information about fasting as well as some great recipes!

Although you can juice almost anything, here are some of the combinations that I came up with:

NOTE: make sure to wash your produce very well.  It should be clean enough to eat raw.

Green Juice:
This is my classic go-to juice!

2-3 stalks celery
2 green apples, cored and quartered
1 large bunch kale (you can juice the stems as well as the leaves)
1 knob of ginger (about 1/4 cup or less)
1 lemon, peel removed
optional: one cucumber


Orange Juice:

1 yam
1 grapefruit, peeled (the pith on grapefruit can be very bitter, so I would remove as much of it as possible)
1-2 cups grapes
1 lemon, peeled
1 knob of ginger


My juicer recommends juicing the soft things first (citrus, kale, grapes), and follow them with the hard veggies/fruit (apples, carrots, yam), but each juicer might be different.
Also, the juice will separate easily, so make sure to stir or shake it well before drinking.

Whether you fast or not, these juices are delicious and fun to make.  They are good at any time of the day, but are especially wonderful for breakfast.  They are a great way to naturally energize you for your day!  So get juicing and enjoy! :)

Monday, February 25, 2013

Juicing and Healthy Smoothies Part 1

This past week, I've really been into breakfast smoothies.  I'm wishing for warm weather and sunshine, and maybe a cold, fruity smoothie might help the weather along?  Probably not, but I'm in the mood for the healthy revival of spring.  What better way to celebrate Spring's reawakening than to rejuvenate yourself with  healthy food!  Nutrition is one of my passions and I'm always looking for better ways of eating.  I do not like "dieting"; I believe in changing your food choices to create permanent habits.  A fad diet is always going to go out of fashion, but eating healthily is a life-long practice.  Ok, ok, I'll try not to get too preachy, but this is what I love and I want to share my tips for getting more nutrients easily into your diet.  
Today, I want to talk about digestion.  I have had digestive issues my whole life, and a few years ago, while taking my nutrition class, I wondered if I might be lactose intolerant.  Since that time, I experimented with going off milk products, and have felt so much better!  However, I still look for ways to grow a healthy digestive system.  This week, I explored two ingredients that are great for your tummy: kefir and ground flax seed. 


 I don't know that much about kefir except that it is a fermented milk product, but my brother was drinking it when he had tummy troubles, and I've heard that it's better than yogurt in its probiotic content.  I have been eating soy yogurt (which is actually not bad), but I wanted to make a smoothie loaded with nutrients, so I decided to try out kefir instead of yogurt this time.  I found a lactose-free version at my grocery and have been eating it all week.  I do like it, however, I'm still not sure that I handle cow milk...even if it's lactose free.  In that sense, soy yogurt might be better for me.  Despite that though, I know kefir works well for many people and is super healthy.  Plus, probiotics help my digestive and immune system, so ingesting them in any form is good.  If you aren't lactose intolerant and want to try something new, kefir is a good option.  It tastes a lot like buttermilk, and made a delicious, silky smoothie.

Now, I learned all about the benefits of flax seed in nutrition class.  They are packed full of omega-3s (which are essential fatty acids, meaning you can't make them naturally in your body) and fiber.  So, I bought some and started putting them in our morning granola.  Not long after, though, my husband told me not to put "sharp things" in the granola anymore.  "What sharp things?" I asked myself.  I soon realized that it must be the flax seeds since everything else was easily chewable.  After than, I stopped using them.  What I had not known then, was that flax seeds need to be ground up in order to receive their full benefit!  Otherwise, they are just sharp little indigestible seeds.  I feel really dumb now that I know that, but I had no one to tell me otherwise.  So, I'm telling you all now!  They can easily be ground in a spice/coffee grinder, and can go on almost anything.  They are great on salads, in bread, and can even be an egg substitute (1/3 cup flax seeds to 3 cups water, heated and cooled), though I have yet to experiment with that!  I've only put them in smoothies so far.  I was surprised how well they blend into the smoothie because I though they would be hard lumps, but once flax seeds are ground, they turn into a soft flour.  


T.E.A's Healthy Smoothie

1/2 cup kefir
1 cup milk (cow, soy, almond, or whichever you prefer!)
1 cup fresh or frozen fruit 
2-4 TB ground flax seed
sweetener, if needed (I didn't use any sweetener, but I thought it was still delicious!)

1. Grind flax seeds in a spice/coffee grinder.
2. In a food processor, add all ingredients and blend until smooth.  Add more milk as needed.
3. Enjoy!


Stay tuned: next time I will be talking about juice fasting!  

Thursday, February 21, 2013

Homemade Peanut Butter Cups!

Ever since Valentine's day, I've had quite the sweet tooth.  I didn't gorge myself on the marshmallows I made, but I've been making a lot of carrot cake with chocolate chips.  It's just too good!  The other day, I substituted granny smith apple for the carrot in the recipe, which made the cake super moist and luscious.  But my waistline is suffering from all those carbs!  It is a sad day when you wake up in the morning and realize the past few decadent days have not been kind to your already curvy figure.  However, I have the hardest time going cold turkey when I'm still craving sweets.  So, I decided to let myself down gently.  No more cake...at least for awhile.  Instead, I decided to abstain from carb-heavy sweets, and center my taste buds on something less sweet, but no less satisfying: homemade dark chocolate peanut butter cups!


 Now, this might not sound like a good substitute, in fact, it sounds just as decadent as cake is (which it may be), but I would argue that peanut butter cups are better for you in several ways.  First of all, using dark chocolate eliminates a lot of the sugar present in milk chocolate.  It contains more of the cocoa bean, which is where all those yummy flavanoids and antioxidants that make chocolate healthy come from.  Secondly, making your own peanut butter filling helps you, again, control sugar content by adding your own amount of sweetener (if any).  If you choose a peanut butter that is already sweetened, then adding sugar is unnecessary.  I use bulk peanut butter that you can get from dispensers at health food stores.  It contains ground up peanuts, unsalted and unsweetened, so I use a small amount of sugar for my filling.  Thirdly, I use a little bit of coconut oil and coconut cream for the peanut butter filling, which is very good for you.  Lastly, these rich little peanut butter cups satiate my sweet tooth better than an entire piece of cake.  One or two bites and I'm good.  

Or, you can skip the logic, and just have fun making these!  They are fun and delicious.  The only down side to them is they must be kept in the freezer or refrigerator or they might melt.  So, they might not make a great gift to send through the mail, but they would certainly be great for a little chocolate pick-me-up, or a treat to share with friends.
Oh, also, these are vegan and gluten-free! :)


T.E.A's Dark Chocolate Peanut Butter Cups
makes about 8 small cups

1 1/2 cup dark chocolate chips or chopped chocolate bar
1/2 cup peanut butter
1/4 cup coconut cream (or whole coconut milk)
1 TB coconut oil (unrefined is great because it tastes more like coconut)
1-2 tsp sweetener (honey, agave, brown sugar)


This is coconut cream...the soft, buttery cream that rises to the top of whole coconut milk. If you aren't lucky enough to find a can that has seperated like this, using the whole milk is fine too.  It will be just slightly more liquidy.

Equipment:
double boiler (or sauce pan with stainless steel bowl over it)
little tart tins or candy molds or cupcake wrappers

It's 1:22...perfect time for double boiling!


1. Set up your double boiler: fill a saucepan up about half way with water and set a stainless steel just so it rests on top.  The bowl should not touch the water.  Heat the double boiler until the water boils gently.   Add chocolate to the bowl and slowly melt.  When chocolate is melted through, turn off the heat and leave the bowl to rest.  This will keep the chocolate warm and ready to pour.


NOTE: you can use the microwave to melt chocolate, but you have to be much more careful.  A double boiler ensures that the chocolate is not touching direct heat, and so burns much less easily.  Chocolate, in the microwave, can burn quickly, so heat it for a few seconds at a time and stir in between so the chocolate melts evenly.  It shouldn't take more than a few minutes total to melt the chocolate through. 
NOTE #2: If using a double boiler, make sure to keep water/steam out of the chocolate.  If even a tiny drop of water gets in the chocolate, it could seize up.

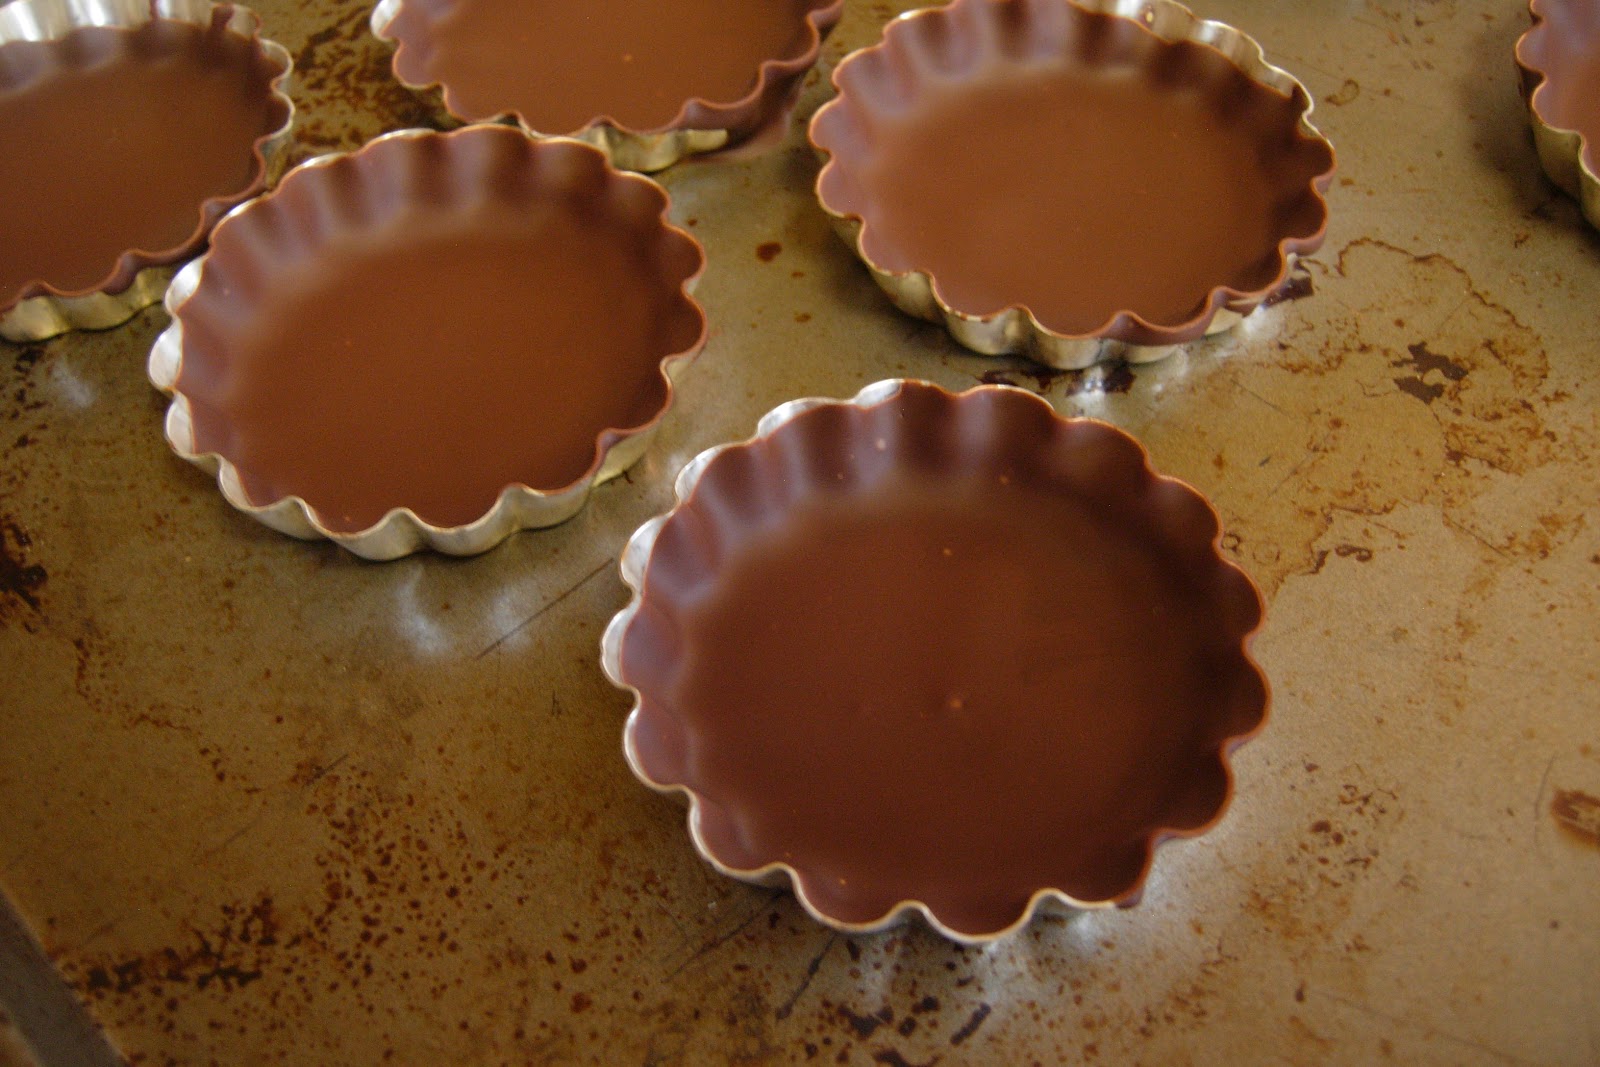
2. Pour a small amount of melted chocolate into your tart tin or cupcake wrapper.  Turn the tin around to coat all the sides.


3. Put all your coated tins/wrappers on a baking sheet and put into the freezer to harden.
4.  In a separate bowl, add in peanut butter, coconut oil, coconut cream, and sweetener.  Microwave for a few seconds to warm and melt the oil or, if you have another double-boiler-safe bowl, you can use the double boiler to heat it through.  Whisk to combine.  Set aside to cool.


5. Take chocolate molds out of the freezer and pour a small amount of peanut butter filling into each.  The filling should reach about half way up the chocolate.


6. Put the filled molds into the freezer again, for about 5 minutes or until firm.  

NOTE #3: I made the mistake of trying to top the peanut butter filling with warm chocolate before they firmed up...and that was a melt-y mess.  It is best to be patient and make sure the chocolate and the filling are firm before topping them off.

7.  Once the filling is firm, top the molds off with more melted chocolate until the molds are full.


8. Place the cups into the freezer once again to harden.  Once the cups have hardened, you can pop them out of the tins or wrappers.  Store in an airtight container in the freezer or refrigerator.


One Last Tip:  Have any extra chocolate left over?  Pour it onto a piece of parchment paper and set it in the freezer along with your peanut butter cups.  Once it is hard again, it will easily come off the paper and you can store it to use again later.  I keep all my chocolate in the freezer to stay hard and crisp!


Have fun and Enjoy!