Wednesday, January 16, 2013

Kuaytiaw


No, I don't know how to pronounce Kuaytiaw, but I do know that it is delicious.  I found this recipe in one of my favorite cookbooks: The World's Best Street Food: Where to Find it and How to Make it by Lonely Planet.  It has been my new goal to make a menu for each week, and then plan my grocery trips accordingly.  I realized recently that, although I love going to the grocery, I have the tendency to buy food without purpose or, at least without a complete thought-out plan.  I might buy food for one meal, and then get lots of random things on the side hoping that I will be able to figure something out in the days to come.  Sometimes, this does work, since I love (obviously) to experiment.  However, there are many times when I plan a meal in the morning, only to find that I'm missing ingredients, which forces me to change my menu.  That is not always a bad thing, since I have been able to come up with many new dishes, but it can be a strain on our pocketbooks, since I found myself always going back to the store for more ingredients that I lacked.  So, in the spirit of the new year, I have decided to make a better plan, to turn my house into a seasonal restaurant of sorts, and make my grocery visits count.
Although my intentions are sound and good, this planning is easier said than done.  This means that I'm having to look through all my cookbooks for recipes, or at the very least for inspiration.  This went spectacularly the first week and my one run to the grocery was quick, efficient, and cheap...plus we had food that lasted a full seven days.  I thought, "Well, hey, if it was this easy, I should have been doing this years ago!"  This week, however, I have had less good luck.  I did plan out a menu, but it is sometimes hard working with a budget, and with the seasons.  So many of the things that I wanted to make (like a Mediterranean salad with homemade falafel balls), are heavy on the summer produce.  It is nearly impossible to get a good, fresh tomato in January, and most of the other "summer" produce is coming from Mexico.  I am always conscious of where my food has come from and how it has been picked, packaged, shipped and even ripened for my enjoyment.  I'm blessed to live in a part of the country that cares just as much (and more) as I do about this, and my grocery, New Seasons, strives to provide a large percentage of local products (and by local, that includes the whole pacific northwest).  So, I had to go back to my winter mindset and decided on a comforting Thai soup, enchiladas, and stir fry (yes, that will include some produce from warmer lands...but, hey, sometimes you have to compromise).  That was about as far as I got this week, so we'll see how the end of the week goes.  But I will make a huge pot of beans, and slow cooked beef for enchiladas....so that might last us a couple days.

So, now on to the Kuaytiaw!  This is a Thai noodle soup that the cookbook calls the "hamburger" of Thai street food.  The ingredients and technique are ridiculously simple, plus it has both cooked and fresh elements to make a completely balanced meal.  I, of course, made some changes to this recipe (since we don't eat pork in our household), but I kept it pretty simple.

Kuaytiaw: from The World's Best Street Food Cookbook
(measurements are in metric...since the whole rest of the world uses it but us! haha)

10 oz pork or chicken stock
1.7 oz fresh rice noodles or 1.4 oz dried rice noodles
5 small pork balls or 2 TB cooked, shredded chicken
1 tsp white pepper
handful of bean shoots
handful of coriander (cilantro) leaves, chopped
fried garlic or onion flakes
spring onions, chopped
red chiles, chopped
wedge of lime for garnish

1. Boil the stock in a small saucepan
2. Add the noodles, pork balls, and while pepper and simmer until noodles are cooked.
3. Pour the soup into a bowl and top with the bean shoots and coriander leaves.
4. Garnish with fried garlic flakes, spring onions, and as much chili as you want and squeeze over some lime juice.  Serve immediately.

This is the exact recipe from the book.  And I'm sure this version is perfectly delicious, but being me, I had to make my own version.
For example, I used bean thread noodles instead.  I couldn't find rice noodles, and I didn't want to used udon or egg noodles, though those would work just fine, too.
Also, since we don't eat pork, and I wanted something comparable to pork balls, I decided to use chicken sausage instead.  I found some fresh, premade basil chicken sausage in bulk at the grocery.  I actually think this was a really good compromise because this soup needed a little fat and flavor.  Plus, I love basil in Thai dishes.  But, again, shredded chicken would also work just great in here as well.
I also added in more veggies because I thought the soup needed a little bulking up.  I used broccoli and mushrooms, but you could also use green cabbage, carrots, or bell pepper.


The Experimental Alchemist's version of Kuaytiaw:

1 quart chicken stock (plus 1 pint water, if needed)
2 large handfuls of bean thread noodles
1 pound basil chicken sausage balls
1 cup mushrooms, large dice
1 cup broccoli, cut into 1" pieces
2-3 tsp fish sauce
salt to taste
bean shoots, chopped cilantro, chopped green onion, lime wedges, and garlic chili oil (see recipe below) for garnish


1. Preheat oven to 400F.  Roll bulk sausage into balls, place in a shallow dish or baking sheet.  Bake for about 25 minutes until balls are cooked through.
2. Bring the stock to a boil.  Add mushrooms and noodles and simmer until noodles are cooked. Add in chicken sausage balls, broccoli, fish sauce, and salt (if needed). Turn off heat, and let sit for 2-3 minutes or until the broccoli is bright green.
3. Pour the soup into bowls and garnish with whatever garnishes you like.

Garlic Chili Oil

3 TB olive oil
5 cloves garlic, minces
3 Serrano peppers (jalapenos or Thai peppers would also work), minced


Heat olive oil in a small sauce pan on high heat until the oil starts to shimmer (about 1 minute).  Pour in garlic and chilies and saute until the garlic just starts to turn brown (about 1-2 minutes).  Take off heat and pour into a bowl to cool.  Use as garnish for Kuaytiaw.  Refrigerate any left over.

Our 'his' and 'hers' happy kitty bowls! :)


This soup is SO delicious and it is so fun to garnish to your heart's content.  You get both a savory soup and a crunchy, powerfully flavored salad all in one!  Enjoy! :)


Monday, January 14, 2013

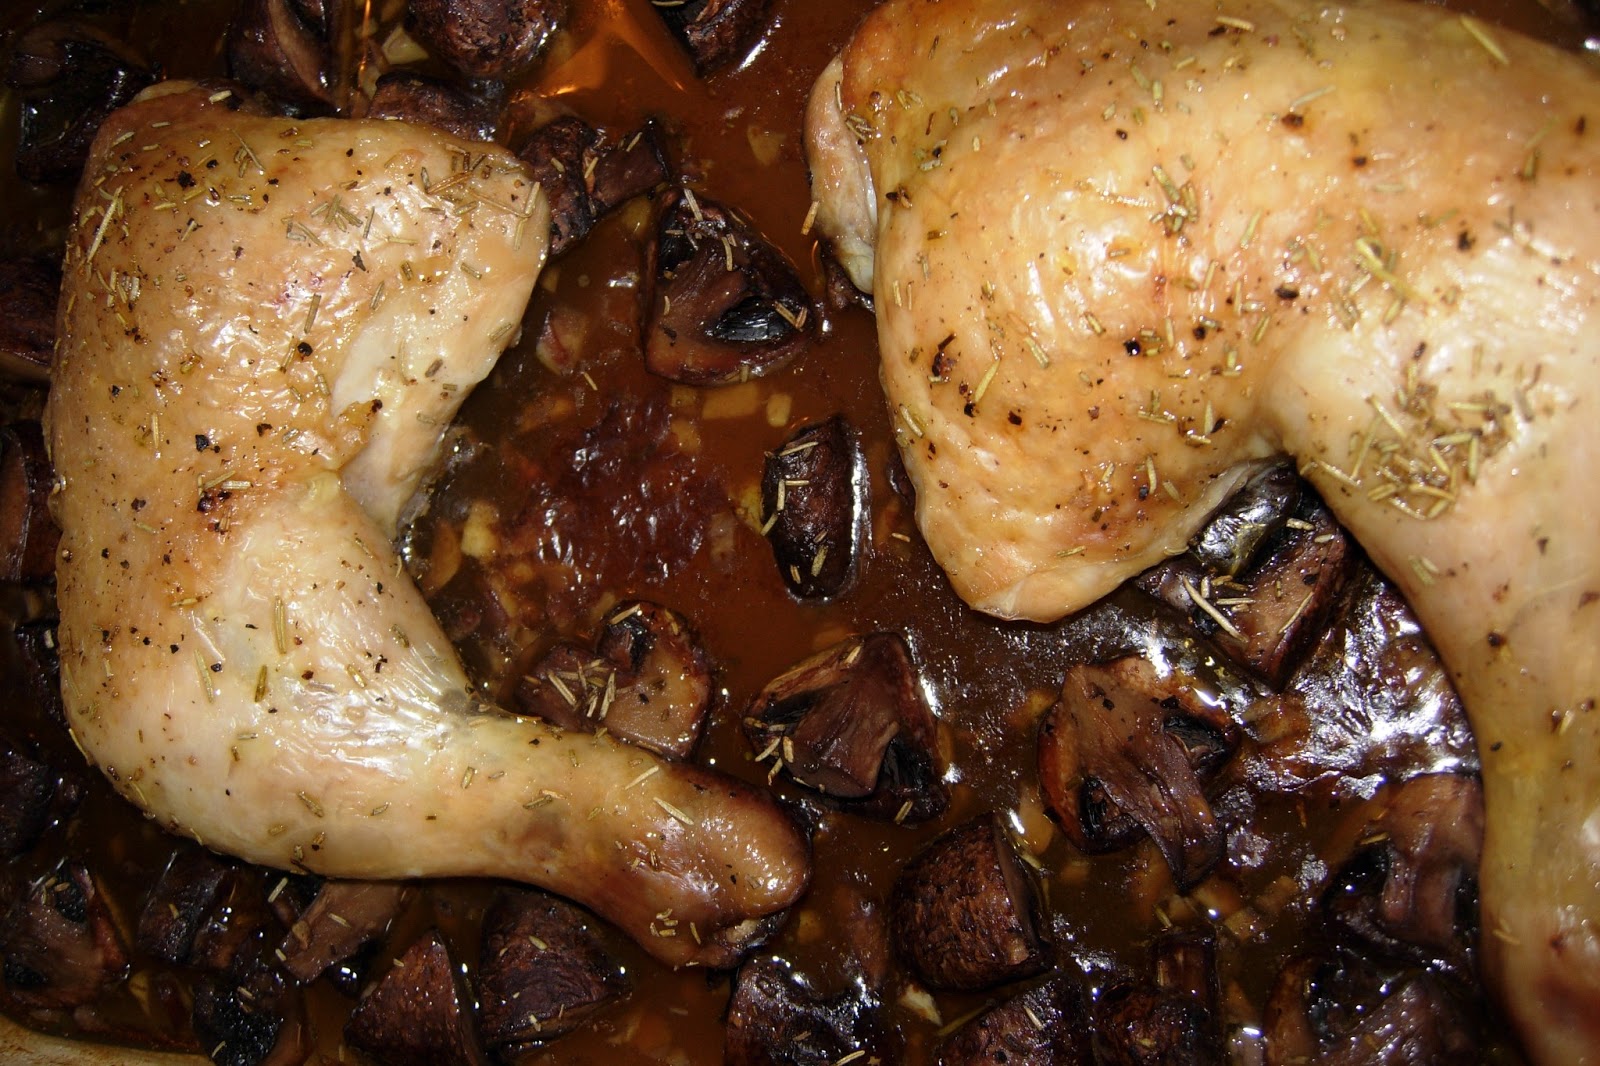
Baked Chicken with Roasted Mushrooms, Beets, Sauteed Greens

So, I found a really yummy roasted beet salad recipe the other day.  And I had ever intention of making it this week.  But some days don't always go as planned.  Yesterday was one of those days...a "burn all your cookies in the oven" kind of day.  Yes, that happened.  It was very sad. :(  
Maybe it was just my state of mind at the time, but I decided to scrap the beet salad for a chicken dinner.  I had some chicken in the freezer, and some mushrooms, and some greens....so baked chicken with roasted beets and greens sounded like a plan.  I have every intention of making that delicious beet salad, but in the interim, here was my adjusted dinner menu:

The beets aren't even pictured here, haha!

Menu:
Baked Chicken with Mushrooms
Roasted Beets
Sauteed Beet Greens and Kale


Baked Chicken with Mushrooms:

2 large chicken legs (with leg and thigh), bone in (or whatever kind of chicken you have on hand!)
1 cup wine (I used red, but I think white is better...or a little vermouth is good too!)
3-5 cloves garlic, rough chop
1-2 cup mushrooms, cut in 1/2 or 1/4ths
1/4 cup olive oil
1 tsp dried rosemary
salt and pepper to taste

Preheat oven to 400F.  In a large casserole dish, add in wine, garlic, mushrooms, olive oil, and a little salt.  Toss until mushrooms are coated.  


Nestle chicken amongst mushrooms and sprinkle with salt, pepper, olive oil, and rosemary.  


Cover dish with aluminum foil and bake for 30 minutes.  Take off the aluminum foil and bake another 15-20 minutes until chicken is golden brown.  Serve with the mushrooms and little sauce on top.
(Baking times might vary depending on the type of chicken you use.  Chicken without bones will cook more quickly as will smaller portions.  Keep an eye on your chicken to make sure it is not drying out.  By covering the chicken and letting it braise in the oven, most of the moisture should be contained, however, white meat can dry out fast.)


Roasted Beets

5-6 medium sized beets
water

Preheat oven to 400F.  Wash beets thoroughly, and trim the top and bottom of each beet.  Put beets in a casserole dish with enough water to cover the bottom.  Cover with aluminum foil and bake about 45 minutes or until a butter knife can slice through them.  Take beets out and let them cool until you can handle them. 


Peel off the outer layer of skin (your hands will turn red!).  You can either slice these or dice them and add them to salads, or in this case, as a garnish on top of sauteed greens.
Why no salt in this recipe?  I don't think beets need any flavoring at all.  They are so succulent and sweet on their own!  But you can add a little salt to taste if you want to.


Sauteed Greens

4-6 cups of shredded kale and beet greens (or other fibrous dark greens)
2TB olive oil
salt to taste
water 

Additions:
minced garlic
red pepper flakes


Wash greens thoroughly, and drain them well.  Heat oil in a large skillet on medium high heat. Add in garlic and red pepper flakes (if using), and cook, while stirring, about 1 minute.  Add in greens and sprinkle them with salt.  Add in a little water to help steam and wilt the greens.  Stir the greens until they have wilted, but are still bright green.  Serve immediately.


Cooking/Prep Tip!  Place greens (any kind) in a large bowl (or clean sink) filled with very cold water.  Swish greens around and let them sit for 15-30 minutes.  This both cleans the greens well, but it also refreshes any greens that have begun to wilt.  I had some very wilty beet greens, but I left them in cold water for about 30 minutes and they looked as good as new!
Also, lift them out of the water to drain them.  If you pour them out, some of the silt/dirt on the bottom of the bowl could get poured back onto the greens.


Well, despite the mishaps of today and the re-adjusting of the menu,  I'm still happy with what I produced.  A good dinner can really improve your day.  I'm always happy to pull a hot meal out of the oven when my husband comes home and sit down to enjoy it with him.  Those moments always help to center me back to what really matters.  I might have been really scatterbrained all day, but this hearty, warming chicken dish was so comforting.   And I went on to spend a wonderfully relaxing evening playing games, drinking a little wine, and watching Deep Space Nine with my husband.  So, yeah, it wasn't such a bad day after all. :)


Saturday, January 12, 2013

Comfort Food: Pasta Puttanesca

Hi Fellow Alchemists!
Yesterday, at the end of the week, it was time for some comfort food.  Our favorite comfort food is pasta!  Since I'm lactose intolerant, I've found some new pasta sauce recipes that are so good that cheese is not required.  My number one favorite is pasta puttanesca.  The first time I had ever heard of pasta puttanesca was in A Series of Unfortunate Events.  In that movie, the children have to make dinner with almost no ingredients, so they decide to make pasta puttanesca.  This made me think that this dish was an "everything, but the kitchen sink" kind of meal.  Or as one chef I know told me...a "Mustgo" dish because when you look in the refrigerator and see all the food that is going bad, you say, "that  must go, that must go, and that certainly must go" and you create a meal with all those ingredients.  Because this dish seems so aimless, I didn't consider a great culinary achievement.  However, this is not so!  Pasta puttanesca is one of my favorite dishes.  It is rich, hearty, and transports me to the warm hills of Italy every time I taste it.  It brings together all the flavors of the Mediterranean (olives, capers, anchovies) together into one simple, perfect dish.


(And if you're saying to yourself, "I don't like anchovies," think again!  This dish just might convince you otherwise!  You can also add a little or a lot, depending on your preference, but their fishy flavor compliments this sauce wonderfully.)

My recipe is an adaptation of Emeril Lagasse's pasta puttanesca recipe:
( http://www.foodnetwork.com/recipes/emeril-lagasse/puttanesca-sauce-recipe/index.html ).  I usually follow it quite closely, though this time, I created my own version of it.  Plus, this time I found some absolutely delicious fresh, Turkish anchovies!! I have only used canned anchovies in the past, but had found them to be very salty.  I just happened upon some fresh ones this time...and boy were they good!  They were bigger fillets (without bones) that were marinated in a brine of salt, vinegar and oil.  And I could have eaten them all by themselves!  They were salty, acidic, flaky...perfect.  But I ended up adding them all to the sauce.  This made my dish very fishy, but in a good way.  If you are going to use canned anchovies, I would stick with smaller quantities as they can be very rich and salty.  

Also, I learned that capers can last a year (opened) in the refrigerator.  Just a good fact to know!

I also used nicoise olives, which are small, mellow, black olives.  My grocery has a great bulk selection of olives, and if you can find them, I would recommend trying out different varieties.  I have used kalamata olives before, which are delicious and fruity, but they are much bigger than the nicoise and much be cut in half so they integrate better in the sauce.  I have also used dry salt cured olives (which are usually very black and wrinkled), but these tend to be extremely rich and salty and did not work as well as the others.  If you have little olive selection, I recommend staying with kalamata.  These are usually easy to find and very versatile. 

This time, I used whole wheat pasta shells.  I like a pasta with ridges or crevices that soak up all the sauce!  Traditionally, this is made with spaghetti noodles.  But you can use whatever you like!

Pasta Puttanesca 
Adapted from Emeril Lagasse
Note: This recipe makes about 2 quarts of sauce.  I intended to make a lot of sauce, then freeze 1 quart for later.  However, this sauce is so good, that it went fast!  This recipe should feed about 6-8 people, or there should be enough for leftovers!

2-3 TB olive oil, plus any anchovy oil
1 large yellow onion, small diced
6-8 cloves garlic, minced
6-8 fillets fresh anchovies or 2 TB canned anchovies, minced
3 TB capers
1 cup nicoise or kalamata olives, with juice
2 15 oz cans whole tomatoes, pureed (or chunky, whatever you like)
1 pound whole wheat pasta shells
salt to taste (Though you might not need any!!! Taste before you add extra salt!!)


Additions:

Add in with garlic:
1 tsp dried oregano
1 tsp red pepper flakes
1 tsp dried basil, crushed

Stir in the sauce right before serving, or sprinkle on top:
1/4 cup fresh parsley, minced
2-3 TB fresh basil, chiffonade
grated Parmesan or manchego cheese


1. In a large skillet or pot (I used my soup pot since it makes a lot of sauce!), heat olive oil and any anchovy oil on medium high heat.  Add in onions and cook 5-8 minutes until soft and slightly caramelized. (If you onions are getting too brown, turn the heat down...or add in a little water or olive juice to keep your onions from sticking!)


2.  Add garlic to onions and cook 1 minute or until fragrant.  Add capers, anchovies, olives (and any juice), and tomatoes.  Turn heat up, bring to a slow boil, then turn the heat down and slowly simmer for about 40 minutes.


3.  When the sauce is almost done, add the pasta to boiling, salted water until al dente.
4. In a large skillet mix the pasta with the sauce.  Or serve the sauce over the pasta like regular spaghetti.


Yay for Friday Night Comfort Food!!  Enjoy! :)

Thursday, January 10, 2013

Black Bean Burger Breakfast

So....last night I didn't take any blog pictures while I was cooking.  Sometimes, I just get in the zone...and taking pictures every few minutes really messes up my flow.  Plus, I have to take many, many pictures because most of them come out blurry.  As you might have noticed already, my pictures are not professional quality, though we do have a pretty awesome camera (a Nikon Coolpix P4).  However, it is about 7 years old (almost as long as my husband and I have been together), and it is starting to show it's age.  It takes spectacular up-close shots, but without the right lighting, it is hard to get it to focus properly....
Well, enough on that end.  I guess I just need to suck it up and start researching new cameras!  In the mean time, you will all have to deal with my very noob-ish pictures. Ha ha.  
And since I didn't take any pictures last night, I have very few to share with you today!  That will sure teach me!  I having to quickly learn how to manage my time cooking and taking pictures at the right moments.  I like showing the whole process of a recipe from start to finish, but there are so many times when the veggies are sauteing, something is in the oven, and I'm pureeing something in the food processor...and I totally forget to document it!  And making food look pretty is actually kind of hard.  I'm so far fairly happy with my pictures, but I never noticed how dark my kitchen gets in the evenings.  And my lights have a yellow-ish tinge to them.  I'm going to have to experiment some more and see how I can improve my photography.  If any of you have any suggestions...let me know!

I did take some pictures this morning, though, because I really wanted to share these black bean burgers with you.  I got the recipe from the Moosewood cookbook again (it was very influential in my menu planning this week), but I think it was pretty successful.  I also made some yummy condiments to go with the burgers that (in my opinion) really made them that much better.  There were a few things that I would change, though...although it wasn't the recipe's fault, but my own.  Well, we're always learning!

And as you might know by now, these also make a fabulous breakfast.  I just can't recommend the "Leftover Breakfast" enough.  If you make enough the night before, you have plenty to heat up for breakfast.  All it needs is a perfectly runny over-easy egg, and your delicious breakfast is ready!

Menu:
Southwestern Black Bean Burger
Homemade Salsa
Avocado Mayonnaise
Arugula
Seven Grain Bread (from New Seasons)
Fried Egg


Southwestern Black Bean Burgers
From Moosewood Restaurant Cooking for Health Cookbook

2 tsp olive oil
1 cup onions
2 tsp ground cumin
1 tsp ground coriander
1/4 tsp salt (or to taste...I felt like these needed a little more salt)
dash of ground black pepper
1 cup finely chopped mushrooms
1 cup grated carrots
1 fresh chile, minced or 1/4 tsp cayenne (I used cayenne)
1/4 cup orange juice 
1 cup ground tortilla chips (whirl in food processor until they resemble coarse cornmeal)
2 15-oz cans black beans, drained and rinsed
1 large egg, lightly beaten

1.Warm oil in a skillet on medium high heat.  Add onions and cook for 5 minutes, stirring often.  Stir in the cumin, coriander, salt, pepper and cook until the onions are soft.  Add the mushrooms, carrots, chiles, and orange juice, lower the heat to medium, cover and cook, stirring occasionally until tender, about 8 minutes.
2.While the vegetable cook, combine the ground tortilla chips, beans, and egg in a large bowl and mash with a potato masher, or pulse in a food processor until combined.  When vegetables are tender, drain, and stir into bean mixture.
3.Form the burger mixture into 6 patties (1/2 cup per burger) and place on lightly oiled baking sheet.  Bake in a preheated 375F oven for 25 minutes until firm and lightly crusted.

What I would changed about this recipe:

1.  I'm personally not sure that I loved the orange juice in this recipe, and since my burgers were super moist (almost mushy), I'm not sure it was needed at all.  I might have just gone with a squeeze of lime/lemon for some flavor and acidity.
2. I think I ground my carrots and mushrooms too finely.  Mine came out like coarse meal out of the food processor, which I think had something to do with the burgers holding too much liquid and being mushy.  I would have kept them somewhat chunky.
3. I did use cayenne, though I think jalapeno would have been better and would have given the burgers a fresher taste.
4. Although I did like the coriander, I think I would have put less in and added in a little chili powder.
5. I think some fresh cilantro would also be great in these.
6. I used fresh black beans, which are good because you can control their salt content.  However, since these burgers could have used more salt, it really doesn't matter what kind of bean you use.
7. TASTE the mixture before you put in the egg.  Put the egg in last (you don't want salmonella when you're tasting), and taste to make sure the seasoning is right.  I meant to do this, and promptly forgot.  So, my burgers were slightly bland.
8. Form the patties uniformly and make them about 1/2 inch thick.  This way the patties will cook evenly and not be so mushy in the center.  Mine were a little too thick.

Ok, so I might have changed a lot, but I love analyzing recipes and what I could do differently next time.  I've always wanted a great recipe for a vegetarian burger.  This recipe is definitely the best one that I've tried so far, but I could most certainly do it better next time.

Fresh Salsa:

1 cup canned whole tomatoes, drained (or fresh when in season)
1/2 cup yellow onion, large dice
1 large jalapeno (more or less depending on how spicy you like it!)
2-3 cloves garlic
1/2 cup fresh cilantro (stems are ok)
salt to taste

Add all ingredients into a food processor.  Pulse until it is the consistency of your liking.  It can be thick and chunky or fully pureed.  Store in an airtight container and refrigerate.  Should keep for 5-7 days.

Avocado Mayonnaise

1 avocado, peeled, cored, large dice
1/4 cup mayo
1 TB lemon juice
salt to taste (if needed)

Add all ingredients to a food processor.  Puree until smooth.  Store in an airtight container and refrigerate.  Place plastic wrap over the top of the mayo (touching the surface).  This will help slow the oxidization process...help it not to turn brown!

Prepare this burger like a beef one with ketchup and pickles on a bun, or try it my way...open faced on toast with a fried egg!  Or you could even make a salad out of it!  Whatever you try...ENJOY!!! :)


Wednesday, January 9, 2013

Chicken Coconut Curry Crepes


Well, I just got finished eating these delicious crepes for breakfast!  That might sound weird, because we had them for dinner too, but we always have leftovers for breakfast...with an egg on it!  And these crepes are delicious for any time of the day.
I was inspired to make these while I was looking through my Moosewood Cookbook where I found a really great recipe for chickpea (or garbanzo bean) flour crepes.  They had an Indian style flair to them (ginger, cumin, cayenne, mustard seeds, cilantro), so I had to try them.  However, the cookbook is vegetarian/vegan, and I couldn't find a satisfying recipe for a crepe stuffing.  I though chicken would go nicely...maybe something slow braised and spicy.  Or maybe, something crunchy like fried chicken would have a better texture?  Maybe with a creamy coconut curry sauce?  Yes...that sounded good.  So, that's exactly what I set out to do.
Menu:
Chickpea crepes
Pan fried chicken strips/bites
Spicy coconut curry sauce
Arugula or cilantro for garnish (or both!)
Fried egg (optional for breakfast!)


Chickpea Crepes:
from Moosewood Restaurant Cooking for Health Cookbook, makes 5-6 crepes

1 cup chickpea flour (I used Bob's Red Mill)
1 cup water
1/2 tsp salt (or to taste)
1/4 tsp ground turmeric
1/4 tsp cayenne or minced fresh chilies
2 tsp grated peeled ginger root (I used 1 tsp dried ground ginger)
vegetable oil (I used olive oil)
1/2 tsp black mustard seeds (I used yellow)
1/2 tsp cumin seeds
2 garlic cloves, minced (optional...though I did add them)
2 TB chopped cilantro and/or scallions
vegetable oil spray

1. Whisk together chickpea flour, water, salt, turmeric, cayenne, and ginger until smooth. Set aside.

2. In a small skillet on medium heat, warm 1 TB oil .  Add mustard and cumin seeds, and saute until seeds begin to pop.  Remove from heat, stir in the garlic, and let sizzle a moment.  Whisk this mixture into the batter.  Stir in cilantro/scallions.  


3.Warm a lightly oiled or sprayed 8 to 10" skillet on medium heat.  Pour 1/3 cup of batter into the skillet and tilt the pan to spread the batter thinly over the bottom and up the sides.  Cook for 2 minutes, until firm and golden on the bottom.  Turn the crepe over and cook for another minute or two.  Continue with the remaining batter, adding more oil to the pan when necessary.  Serve immediately or keep warm in the oven.


Note: If you make crepes by drizzling a little oil around the edges while cooking, the edges will come out crispy.  Otherwise, the whole crepe will be soft.  I decided to keep mine soft since I wanted to roll them up and I didn't want them to break.

Pan Fried Chicken

1/2 cup chickpea or wheat flour
3 large chicken breasts
1 TB salt
1 tsp ground black pepper
oil for frying (about 1/4-1/2 cup)


Place flour, salt and pepper in a bowl and mix thoroughly.  Cut chicken into strips or 1" bites.  Heat a large skillet on medium high heat with enough oil to coat the entire bottom.  Toss the chicken in the flour mixture, shake off any excess, and add to hot oil.  Cook on one side until golden brown and crispy (about 3-5 mins), then turn over and repeat with the other side.  The chicken will probably be cooked through at this point, but if it still looks pink, place chicken in an oven safe dish at 400F for about 10 mins.  Drain chicken on paper towels and serve warm.


Coconut Curry Sauce

1 large jalapeno
5-6 garlic cloves
1" square piece of ginger (about 1 TB, or you could used dried)
1 TB curry powder (recipe follows)
2 TB olive oil
1 cup onion, thinly sliced
1 cup chicken broth or water
1 cup tomato juice (or pureed tomato)
1 cup coconut cream (or 1 can whole coconut milk)
salt to taste

In a food processor, add in the jalapeno, garlic, and ginger.  


Grind ingredients until smooth (or slightly chunky is ok, too).  Heat a large skillet over medium heat.  Add olive oil and onions and a pinch of salt.  Saute until soft and translucent (about 5-6 minutes). 

Add in jalapeno mixture and curry powder.  Cook for 1 minutes until fragrant. 


Add in chicken broth and tomato juice.  Bring to a boil, then reduce heat and simmer for 10-15 minutes until slightly reduced.  Turn off the heat and add in coconut cream and season to taste. 
NOTE: Do not boil coconut cream/milk.  It will separate and curdle.


The Experimental Alchemist's Curry Powder:  makes about 1/4 cup

(This recipe takes from both Indian and African influences.  There are thousands of different curry recipes depending on the cuisine, region, and household. So, don't be afraid to experiment with your own curry mixtures!  After all, it's all about how you want your food to taste.  Some additions to curry powder can be dried ground ginger, fenugreek, dry mustard, red pepper flakes, peppercorns, cinnamon, nutmeg, cloves, and chili powder.)

1 1/2 tsp ground turmeric
1 1/2 tsp cumin seed
1 tsp coriander seed
1/2 tsp cardamom seed
1 tsp fennel seed
pinch smoked paprika
1/2 tsp paprika
1/4 tsp cayenne powder

Heat a dry skillet on medium high heat.  Add in the cumin, coriander, and fennel seeds.  Toast seeds while shaking pan continuously for about 1 minute or until fragrant.  Be careful not to burn seeds.
Add all ingredients into a spice grinder (or mortar and pestle) and grind into a smooth powder.  Store in an airtight container.


NOTE: Why use whole seeds and grind them yourself?  Why not just buy pre-made curry powder?  The simple answer is freshness.  Whole spices stay fresher than ground spices for longer.  This ensures that you're always getting the best flavor out of your spices.  There is nothing wrong with store bought curry powder, and if you're going to be making a lot of curry, then it will get used up before it turns stale.  But if you have lots of ground spices in your pantry that have gone unused for a long time, you will notice that they don't have quite the punch they used to.  
The second reason is curiosity and education.  Making your own curry powder ensures that you have to find all these different ingredients and learn what each one looks and smells like.  I think it is important to know what ingredients you're using and how they each impact the food.  
But if I had to be honest, I LOVE making curry powder.  I do it for fun!  Each seed has their own smell and texture, and when you toast them together, each scent blends into something magical.  Some smells are foreign to American cuisine, and they always transport me to faraway lands.  The act of making something from scratch, with my own hands, while creating my own, special version of a recipe cannot be underestimated! 


Putting together the crepes:

1. Place chicken, arugula, and cilantro (if using) in the middle of a crepe.
2. Roll it up like a burrito.
3.Pour curry sauce over it.
4.EAT AND BE HAPPY! :)


Tuesday, January 8, 2013

My Must Have Granola


Hey you other Alchemists!  I'm back after several weeks hiatus.  I was having a fabulous time not doing anything!  My husband had three weeks off from school, so we made the best of them.  Lots of tea, and fuzzy socks, and our new favorite card game, Netrunner!  If any of you have any interest in card games that involve a lot of strategy, bluffing, and resource management...then this game would certainly be one to check out.  We got it as a Christmas gift, and have already played close to 20 hours of it.  Like I said...lots of tea, fuzzy socks, and card games...haha.
Our vacation actually would have involved bashing around San Francisco with our family, but we picked the biggest winter storm of the season to travel in.   We were supposed to get in before Christmas and stay until New Years, but horrible roads and multiple wrecks turned us back home.  I was deeply sad because I've never spent Christmas away from family.  But thankfully, I have the best little family (my husband and our two dogs), so we had a warm, quiet Christmas together.  And thankfully, the weather cleared a few days later and our family was able to come see us!  That made the whole week fantastic!  We went to see Les Miserables, ate yummy Mexican and Thai food, played boardgames, and had some wonderful conversation.  It was great!

So, back to food!  I thought I would share a classic recipe that I've developed over time that speaks to me of snuggly days at home: my homemade granola.  It seemed appropriate since our Christmas involved spending a large amount of time hibernating at home, although this particular recipe is a year round staple for us. I always keep a giant plastic tub full of granola in the pantry.  It is perfect for breakfast...especially with a little yogurt...and it makes a great afternoon or evening snack.  It is healthy and filling.  Plus, it can be changed or added to easily, so anyone can tailor the recipe to their desires.  As always, I rarely make it the same way twice (because it can always be better), but I have learned the basic technique is sound and worth following.  And I have learned what NOT to do, which can sometimes be the most important aspect of any recipe!

The Experimental Alchemist's Homemade Granola

1/4 cup coconut oil
1/2 cup honey
1/2 cup molasses
1 cup dark brown sugar
6-8 cups rolled oats
1 cup sunflower seeds
1 cup almonds (whole, or cut into pieces)
1 cup pepitas (pumpkin seeds)
2 TB cinnamon

Put the oats, seeds, almonds, and cinnamon in a very large bowl (big enough to stir everything without it spilling over), and mix thoroughly.


Ready some casserole dishes ready by spraying them with spray oil or buttering them.  The casserole dishes should be 2-3 inches deep...this helps the granola to bake quickly and evenly.
Put the oil, honey, molasses, sugar into a small pot with a little bit of water (about 2 TBs).   Heat on med. high heat until sugar is melted.  When sugar starts to boil, take it off the heat and pour the whole mixture over the oat mixture.


 Stir quickly until all the oats are evenly coated.  Pour into your dishes and bake for 20 mins.  Take out the granola and stir it (otherwise the top and bottom will burn).  Bake another 15-20 mins.

The granola might feel slightly wet and soft at this point, but once it cools, it will be dry and crunchy.  Cool the granola completely (I usually let it cool on the stove for a few hours...if I have the space).  Store in an airtight container.  For this amount, a very large tupperware may be necessary...or you could use a couple of gallon sized ziplock bags.


Although this recipe is solid, you can easily change it up!

Let's start with the oil.  I love coconut oil because it is very healthy for you and it tastes great.  But you can easily use any other light oil like safflower, canola, or sunflower.

Not sweet enough for you?  Or maybe you don't have honey or molasses?  You can use just brown sugar.  I cannot recommend using refined, white sugar since I do not use it myself.  The great thing about honey and molasses is that they are much healthier than white sugar, plus they have their own unique flavors that make the granola taste wonderful.  Granola would taste great with more of each in the recipe.

Now for additions to the granola.  I think this is the most fun part because there are many things you can add to granola to make it unique.  For example, I used to add peanuts into my granola...which made it taste like peanut butter...yum!  Pecans or walnuts would also be great (though not toasted as they will toast in the oven with granola!) Or add in some unsweetened shredded coconut.  This would go perfectly with the coconut oil.  Lastly, there is a plethora of dried fruit that would go perfectly.  Raisins are a good choice, though dried currents, cherries, cranberries, or even apples would be delicious!

NOTE: DO NOT add in the dried fruit before you bake the granola.  It will burn.  Believe me...I have done this and then had to spend time picking it all out again.  It is best to add the fruit in after the granola cools completely.

That's it!  This recipe is so easy to make, does not take long, and lasts our family at least a month.  Enjoy! :)